KLB Backpack

About 5-7 years ago, I made a bag for one of my really good friends, Kristie. At the time, she was cosplaying Kobato. She was fairly new to cosplaying and was struggling to complete her cosplay. Her birthday is the day before mine and we were going to spend the weekend of together. I decided that for her birthday gift I would make her Kobato’s bag.

A few years later, the bag was wearing thin so Kristie – now in grad school – wanted a new bag. She actually had a bag in mind, modeled off a character in some anime; to be honest, I can’t remember because at the same time I had waned out of the anime fandom. But it was a basic black cross body bag with interior pockets. I remember using a pretty Japanese-esque cotton print for the inside.

Fast forward to present day. Kristie is now living and working in Japan. She contacts me via text to ask for a 3rd bag since the 2nd is on its last legs. Only this time she was even more specific. She wanted a backpack like Marinette’s from Miraculous Ladybug.

A backpack?!

She needed a backpack since it was more convenient to wear one while biking to work. I’ve made a number of bags in my life but never a backpack. It was going to be a challenge. Kristie did tell me that if it was impossible so just make the bag a cross body. But no, the perfectionist costumer in me was DETERMINED. So I set out to make a backpack.

It was not an easy task, and I spent many moments huffing and snarling at my machine for not wanting to cooperate. I also did what I promised I would never do after Elsa: hand embroidery. Last time I stubbornly hand embroider satin, this time duck canvas.

Knowing that this bag was primarily going to be used to carry the textbooks Kristie uses in her classes, I needed to find a fabric stronger than the bottom weight twill I used in previous bags. Duck canvas seemed to be a good fabric to use. It’s sturdy and almost waterproof on its own. The only downside is it was thick and would require heavyweight thread and needles.

image

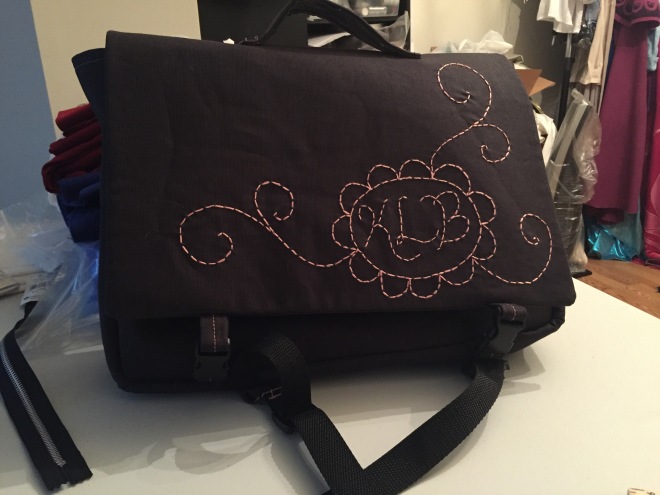
To make the bag unique, I added some hand embroidered details on the front with Kristie’s initials and a free form flower and swirl design. I couldn’t replicate Mari’s design on her bag without the use of applique or an embroidery machine so I did my best approximation.

For the record, embroidering duck canvas is 50 times worse. My fingers were aching after only an hour of simple stitching. But it’s pretty, and I’ll do just about anything for family and good friends.

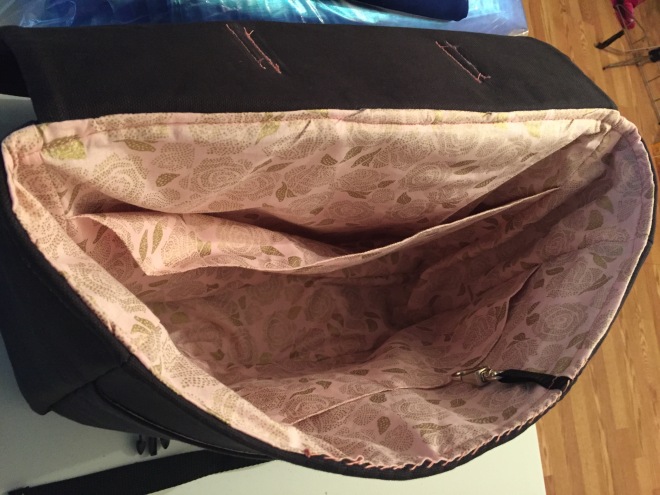
To reinforce the canvas and give the bag its distinct shape, I used heavyweight Pellon interfacing. The interior lining was a pretty pink cotton with gold roses.

image

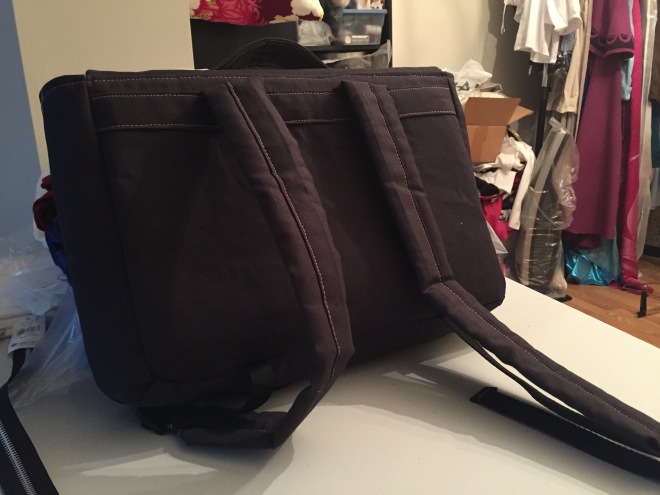
When making such bags, I pretty much free form everything. The bag is roughly 14 inches wide, 10 inches tall, and 4 inches thick. It has a front flap with hand embroidered initials and details, held closed by parachute clips and sports a handle to carry like a briefcase. The 2 inch wide shoulder straps are made from duck canvas, batting, and nylon cord with plastic sliders. The bag itself has one large exterior pocket on the front, one large interior pocket, and two smaller interior pocket. There is also a clip for keys.

image

I’m quite pleased with the result but just hope it stands up to abuse. Japanese textbooks are much smaller than American textbooks but still. The only two requests I was not able to fulfill was a phone pocket (not enough fabric, I estimated just enough) and a zipper (2 layers duck canvas + 2 layers Pellon + 1 layer cotton = my machine was not happy).

The one thing I am most displeased about is my stitching where it’s visible. I try my hardest to make visible stitching as straight and as even as possible in everything. But the thickness of this just wouldn’t allow it. I adjusted my stitch length and tension so many times but nothing seemed to work. In the end, I gave up and decided function and strength outweighed pretty, straight stitches.

Currently, the bag is on its way to Japan, stuffed with post-Easter goodies. I’m really hoping Kristie likes it in person as much as she liked the photos (which, by the way, were taken hastily on my phone so I apologize for the pictures and the messy state of my sewing room).

Outlander Claire Fraser’s Cowl

A couple of months ago I started to read the Outlander series by Diana Gabaldon. I fell in love with the story immediately. Even before I finished the book, I started watching the tv series and fell in love all over again, this time with the costumes. Claire’s costumes are amazing. And that knitwear, to die for.

As I am want to do when I find new knitwear I love, I jump on Ravelry and look for patterns inspired by series. One of the items I definitely wanted to knit was that delightful cowl Claire seems to wear often.

Claire_Fraser_(Outlander_TV)I immediately found the pattern by Shelli Westcott for Ravelry Outlander Claire’s Cowl Pattern. When searching for suitable yarn, I found that Westcott owns a store named Knitterly in Petaluma, CA and they sold a Knitterly Claire’s Outlander Cowl Kit for the cowl. Happy days! I quickly snapped up the dark brown + grey kit; once it arrived, I grabbed by size 35 needles and set to work.

IMG_1407

The pattern and kit call for 3 skeins of yarn, but I found I only used 2 to make the 30 inch cowl. (Oh what to do with that full last skein?) The knitting only took two days (it would have taken one but I started in the evening) and was real quick since it’s all garter stitch and large needles. As usual, the needle size took a toll not only on my hands but my shoulders as well; it takes a lot of strength and effort to hold yarn onto size 35 needles.

Blocking flat took some time as well since a) I have a mischievous cat that wouldn’t leave my cowl alone unless I closed the bedroom doors and b) the yarn is held double so it’s thick and takes longer to dry.

Next I think I’ll try my hand at one of her many fingerless gloves or one of the knitted shawls she wears. So many choices!

Star Wars Rey Cosplay – Outfit

As soon as I finished my Rey wig, I started searching for fabric. I happened upon a forum where someone had posted the fabrics used in the movie (though I can’t find the link anymore). Using that information, I tried to find fabrics in creams, ivories, and pale olives in the same fibers – or as close as I could get. I knew that I may have to do a little weathering and/or dying to get the right look but I wanted to start with as much off white as possible.

First: capris. I purchased a pair of yoga capris in a light gray rayon/spandex fiber. It’s the wrong fiber type (Rey actually wears silk capris) but the drape in the right flow. (I originally made capris from silk dupioni but they didn’t drape right.) The gray was a little to bright for the rest of the outfit so it took a bath in some tea and is now a more dingy gray – which is perfect. They are super comfortable to; I may end up living the entire summer in those pants.

Second: shirt. I made the shirt out of jersey knit in a sort of ivory color. I used Burda 7742 for the base. The collar piece I did modifying the sleeve placket for an Archer shirt, then took an extra strip of fabric to finish off the color. For the sleeve caps, I took excess fabric, pinned it on, cut until I liked the shape, then stitched. I left the sleeve caps unfinished since it appears as if Rey simply cut off her sleeves in the film.

image

The shirt is a bit see-through, but I plan to wear a tannish tank top underneath. Plus the sash will cover up the important parts.

Sash: originally the sash was going to be made of ivory rayon challis, but I soon realized that – like the pants – while it was the proper fiber the drape and feel was all wrong. Instead I used ivory cotton gauze (originally for the arm wraps). I cut the gauze to 1/4 its width, french seamed 3 of the pieces together, then made a narrow double rolled hem on either side. I made a single rolled hem on the short edges to keep from fraying during the dying process (these stitches may come out later). The french seams are strategically placed so that one is on the right shoulder seam of the shirt and the other is on the back near the waist (to be hidden by the belt).

image

Arm wraps: I originally intended to make the arm wraps out of jersey knit and gauze so that I could just pull them on. That didn’t quite work since 1) gauze isn’t very stretchy and 2) I used the gauze for the sash. Instead, I headed to my local drugstore and bought elastic bandage. It had the right look and stretchability. I thought it would take way too long to constantly wrap my arms, but after a test run that took less than 2 minutes it wasn’t so bad. There’s a little bit of restriction in my elbows but nothing horrible. It’s kind of like wearing compression sleeves and, I’m sure, after a bit of movement it will be fine.

Now for the hard part: dying and staining. To get the sweated in look, everything was placed in a dye bath of tea and/or coffee. I used tea bags to sponge on stain near the shirt collar and underarms. Then did an all over dying for the shirt and sash in coffee to get a more yellowed color. More dying in tea for a deep set in stain. Then finished with pearl grey RIT dye for a worn look; the sash went into the RIT dye the longest for a deeper, dingy-er looking stain while the shirt went in for just a minute or two for a dirty look. The above image is the before picture; you can see how everything is just very white and pale.

And here’s the after photo.

image

I am quite happy with the way everything turned out. Dying fabrics is one of my least favorite activities crafting wise so I’m quite pleased with how everything came out.

Next, the accessories – or at least the most essential ones.

Star Wars Rey Cosplay – Wig

I have been a Star Wars fan since I was a kid. I was born the year after Empire Strikes Back was released, but I didn’t actually watch any of the original movies until I was a pre-teen. There was a point in my life during which I could recite verbatim every line in the original three movies. Like everyone one, I am not a fan of the Phantom Menace but I do like Attack of the Clones and Revenge of the Sith – but only due to Ewan McGregor portraying my favorite character, Obi-Wan Kenobi.

Now that The Force Awakens has been released, I am falling in the love with the series all over again. I have been told by a few of my friends that they can picture me cosplaying Rey. I haven’t actually seen the movie myself (stupid motion sickness), but I’ve read spoilers and do – from what little I know – enjoy her character.

e81ed6d3970adfd3f0ed061395f866e7

2016 is the year I take a break from cosplaying to focus on other activities, but Claire Fraser was already on my to-do list. I needed a simpler cosplay for those few cons I am attending. Rey seemed like the best bet: simple to construct (save for the staff), simple to wear.

First part: wig. I used my Peggy Carter wig from WigIsFashion for Rey’s wig. I love Peggy but will likely not wear her in a cosplay in a long while, so to save funds I styled her wig for Rey. It turned out to be not only the perfect shade of brown but the perfect length for all the buns.

rey-wig

It was a relatively simple process. First, I combed back the wig, gathered a small piece at the front and top, and tied it off with a small black elastic band. This would be the little gathered piece at the front of Rey’s head. Then, the rest of the wig was divided into three equal sections to serve as the three buns. Using black elastic bands, these sections were tied off, then partially pulled through to make the loop. A small section of loose hair from just under the loops was wrapped around the black elastic bands then secured with bobby pins.

Two small curly sections were left free just in front of the ear parts to simulate the wispy strands of Rey’s hair. And that’s it! I find a curly wig better for styling than straight wigs. If anyone is looking to replicate this style, I recommend a curly lace front wig no longer than 20 inches in length (any longer and you’re have too much extra fiber to contend with).

Currently my fabrics are on their way so I will hopefully soon get to making the actual outfit.


Teal Cowl

Christmas is a holiday I enjoy, but I don’t generally give gifts. If I find something for someone, I certainly won’t pass up the chance to bestow a gift on someone. However, it’s not the part of Christmas tradition my family generally participates in.

This year, I participated in a Secret Santa event with some friends. The name that was drawn for me was that of my friend Chiki; I was sent her contact info along with a link to her Amazon wish list. Of course I could have just bought something on her list, given it to her, and called my job done. But that’t not really the person I am. So, instead, I decided to use some lovely Knit Picks Galileo yarn I had been hoarding and knit her a lovely lightweight cowl.

The pattern I chose was the Lazy Knitter’s Cowl because it was an easy pattern to memorize and used the exact sport weight yarn I had. The cowl was started just before Thanksgiving; since I was going to be away for the holiday, I took the cowl with me and knit at night in the hotel. It was finished just after I returned the Saturday after Thanksgiving.

The cowl was knit to a total of about 22 inches; once completed, it was wet for blocking, and dried in my closet (up high away from inquisitive cat paws) for about a week. After it was dry, the ends were woven in and two toggle-like buttons were sewn to the cast-on garter stitch edge.

image

As I anticipated, it is a lovely lightweight cowl. With the large eyelets and toggle buttons, the cowl can be worn different ways.

image

The pictures show it as nearly a black color, but the yellow lighting in my home distorts the actual dark teal color of the Galileo yarn.

The cowl took less than a full skein, and I still have 4 full skeins of Galileo yarn left. I am more than certain that there will be more projects with this yarn in the future. I have a lot of lovely, deserving friends. 🙂

Outlander Claire Fraser Part 1: Chemise

I’ve been attending the Carolina Renaissance Festival for the last 10 years, ever since I moved into the area where I could easily attend without a long drive or overnight stay. Ever since my first attendance, I’ve always wanted to go in costume. But I’ve never had an appropriate costume. Sure I could wear any of my previous cosplays to Halloween weekend. But Ren Fest is in a field and they open rain or shine (except on extremely stormy weather); muddy fields and cosplays that aren’t washer friendly don’t really mix. Also, I didn’t want to restrict myself to Halloween weekend to wear costumes.

Then I fell – literally fell – into the Outlander fandom. The truth is I’ve always wanted to make historical costumes. Early period costumes have always been fascinating to me. I absolutely fell in love with the costumes Caitorina Balfe wears as Claire Fraser and wanted to make one. Which one would I start with though? In my early research I found out very quickly that finding appropriate tartan patterns was going to be expensive, so I opted for a “simpler” outfit I could easily find wool and linen in appropriate colors. I decided on her “hunt” outfit since I liked the colors and the knitted capelet. Also Claire rewears the bodice many times, and wears the same (or similar) woolen brown overskirt in other outfits.

c6e7ab5315f75780fdea0f1ecfdcfc18

Even though Outlander is historical fantasy, I wanted a costume that was somewhat period accurate. That meant having all the pieces: chemise, bum roll, corset, petticoat, bodice, pockets, stomacher, and overskirt. So many layers, but I was willing to do it. Knowing that the fit of the bodice and overskirt was largely dependent on the underlayers, I decided it was best to work from the inside out. Thus, step 1: chemise.

Originally I made a chemise out of white muslim and Simplicity pattern 2777 with some modifications. When I was nearly done, I realized that this was going to be too much fabric underneath all the other layers. I could use this chemise for some other, less layer inducing project but not this one. Back to the drawing board.

I ended up remaking the chemise in a much lighter cotton gauze. Since this was going to be the layer underneath everything else, it was going to be subjected to the least amount of scrutiny. So instead of using a period appropriate pattern, I ended up modifying Simplicity 1317 instead, to both get a good fit and cut down on bulk. I added 3.5 inches to the front and back middle folds, increasing the overall width to roughly 47 inches. Since 1317 is a shirt, the hem was lengthen by an extra 17 inches.

image

The seams are French seamed; this seemed the best way to go since sergers didn’t exist in the 1700s. I could have used my serger – no one will see the chemise – but I wanted to try to be as accurate as I could. The hems are all finished by hand using a whip stitch.

t purchased enough cotton gauze to make two chemises since this was the layer closest to my skin and was likely to get the “funkiest.” One chemise had an improvised V-slash neck added to the front and the other had eyelets. The V-slash one is not very neat; it puckers at the bottom V edge. But considering it will be hidden beneath everything else and is the spare chemise, I’m not overly concerned.

image

Now that the chemise is done, next step: corset. Or bum roll. Probably the bum roll since it’s easiest and I already have a pattern and materials.

Who Am I?

Since I have decided to make some changes to my page, I thought it was high time I actually talked about a topic I know the most about. Myself! I’ve already mentioned the fact that I am a self-taught costumer and knitter. But what else am I?

-I’m a certified photographer. In June of this year (2015), I completed my certificate in Professional Photography from the New York Institute of Photography. Because my professional career keeps me busy most of the year, I don’t always have a chance to play with my camera. And when I do, I’m often too tired to want to.

-Speaking of my professional career, I am currently employed as a science instructor at a local community college. I’ve held this position for the last decade, and even once actually coordinated the department. While I like science, it’s been my whole life of the last 16 years. I’m very much looking for a change.

-I’m a hiker. On the occasional weekend – I try for at least twice a month – I strap on my hiking boots, load up my backpack, and take off into the woods. I am, admittedly, a day hiker; I don’t do backpacking and I don’t do overnight camps. The longest hike I’ve completed in a day is 20 miles completely by accident – that’s a story for another time.

-I like reading, but it’s really hard to get me intrigued and keep me entertained. Mostly I read comic books and young adult fiction. Both are short and keep me engaged. But I can be picky with what I like.

-I like stationary shops, zoos, and aquariums. Whenever I go on trips, if there is any of these stores around, you can bet I will make a point of visiting them.

-The US city I have visited and love the most thus far is Boston, MA. I love Boston so much I want to go back, even live there for a time if I could. The US city I want to visit the most is Portland, OR.

-I have traveled overseas to France, the UK, and Japan. I want to visit them all again, plus a few other European areas. I want to photograph their beauty, watch their people, shop their stores, and consume their food. But I hate flying. I really, really hate flying.

-Once upon a time, I was a fan fiction writer. Mostly in the Tolkien fandom. I knew – still do – a lot about the elves of the First Age. The Fall of Gondolin was my speciality. The Flower and The Fountain, those were the days. Sometimes I contemplate doing some actual writing of my own.

-Once in my life, I was an artist. I could create decent sketches. Not so much anymore, but my head won’t stop filling in pretty images begging to be put to paper.

Lastly, at least for now…

-For Christmas, I’m going to Disney World. :3


Unexpected Hiatus

Greetings!

It’s been a bit, hasn’t it? I’m sorry about that. I’ve been on a sewing slump lately and haven’t really made anything. I have mock ups for two Peggy dresses that have just been sitting on my chair waiting to be stitched. The semester has started again and the seasons are changing – which I love but autumn leaves me tired all the time.

I’ve been spending the last few weeks collecting a lot of gently used (and loved) Orphan Black screen accurate clothing. OB has been my latest geek obsession. I managed to cosplay Sarah already but have no photos. Cosima is my favorite so most of the pieces I have been collecting are hers. I am hoping to soon have enough pieces to start collecting photos of me wearing the pieces. But that first requires a camera with wireless remote capabilities. Since my current Canon Rebel does not have that ability, I am saving for a more advanced model and a place in or near my home I can take good pictures with as a backdrop. I am hoping to achieve that soon.

Since my interests constantly change, expect blog posts to change as well. I may show more of other crafts. For example, did I ever mention I collect geek cookbooks? I have two new ones in my hands and am itching to start those recipes. Also, I got a few more knitting books and with the change in seasons it’s time to dust off my knitting needles. I hope despite the changes you will still find something here that interests you.

Thank you all for still sticking with me even though I leave you hanging often. I really appreciate all your support. 🙂

Peggy’s Red Dress

When I set out to cosplay Peggy Carter, I didn’t ever think I would make her red dress from Captain America. I had no occasion or place to wear such a dress to. But it’s Peggy and I love her, and I love her in red. Plus I figured just in case I do have an occasion I should have a dress ready.

ca003

The dress is made of red polyester suiting with (of course) red stain for trim. The pattern is a modified Simplicity 2648 (this pattern is discontinued and I had to get it through Amazon).  The only changes that needed to be made were the sleeves and the pleats on the hips.

IMG_8742I followed the pattern pieces of an A cup and curvy. I added the sleeves from Simplicity 1687 and added satin trim to them. For the collar trim, I used leftover blue polyester lining to draft a pattern but cut out the pieces from satin. I wished I had made them a little more narrow but didn’t realize how wide they were until I started photographing the dress.

For the hip pleats, I took the side front skirt pattern piece, cut a diagonal into it, and then created a large curve in the space to the fabric needed to make the pleats. (I wish I had pictures to show, but I forget to document my process while I’m actually doing it.)

IMG_8744I like how the skirt and hip pleats came out. I have leftover red fabric and am contemplating making a skirt of it for work.

This dress took a little longer than I expected. I originally intended to add lining to the dress to give it a better finish and a smoother drape. But the added lining made it difficult for me to properly use my arms when fully zipped up. Also, I had first used a different sleeve pattern that I realized was better suited for slightly stretchier fabrics resulting in even more limited motion in my arms. I spent an entire morning ripping out the lining and top to make a new top with new sleeves that fit a lot better.

The shoes were acquired off eBay; they are a smidge brighter red but nothing too obvious. The belt was acquired off Amazon. I actually bought three skinny belts for this dress: one bright red, one metallic red, and one light burgundy. The bright red came first and did not match any of my fabrics or shoes. The metallic red is a beautiful belt but a touch too vibrant. The light burgundy ended up being the perfect choice; I figured it would but don’t mind having additional belts in my wardrobe.

I got a lot of help from adriuh via Instagram on this dress. She had already made her own version and was gracious enough to help me when I had questions. She showed me the pattern she used as a base, the draft on Pinterest of how she did the pleats, and even shared her setting pattern for Peggy’s curls and waves. Honestly, without her help I’m not even sure if making this dress would have ever occurred.

So my second Peggy Carter cosplay is done! I think next I’ll work on my blue and red dress from the tv series since it’s my favorite.

Project Rebirth Agent Carter

Agent Margaret “Peggy” Carter is one of my favorite female characters. I loved her from the start in Captain America: The First Avenger; loved her even more in Marvel’s Agent Carter. Peggy is really what got me going into the vintage fashion. She’s my inspiration not just in fashion but also in life as she is a strong, confident woman. I love her blue suit in Agent Carter and have plans to cosplay the outfit at HeroesCon this year. But before that I wanted to cosplay some of her Captain America uniforms.

I decided to start with her Project Rebirth outfit.

CAPTAIN AMERICA: THE FIRST AVENGER

I made a few changes to the outfit since I had plans to used some of the pieces (mostly the skirt) as a work skirt as well. I chose colors that could still pass for being a uniform to keep with the style.

IMG_7983 FixedI used Simplicity 3688 for the skirt. The skirt is made of brown polyester suiting and brown polyester lining; it’s a slightly brighter brown than the uniform skirt but not bad for work. The pattern has extra seams in the front and back which I opted to keep.

The shirt is a short sleeved button down I made using an old pattern in a tan/beige stretch poplin. Unfortunately the pattern was designed to not button all the way to the collar so it’s a little tight up there. I have an alternate white long sleeved button down shirt I bought a while ago to use every now and then. Peggy’s shirt appears to be white but I made a beige alternative. I also made it short sleeved so I could wear this cosplay in a Southern summer without killing myself in the heat and humidity.

I don’t remember the pattern number, sorry to say. I have a lot of button down shirt style patterns and do not recall the exact one I used.

The tie was made using olive green suiting and black polyester lining. I used Sweet Shop Sewing’s free tie pattern. It was really simple to make but somewhat long. I have to tuck it into the skirt so it doesn’t show. The only thing I omitted was the little tab to hold the back of the tie, but it’s not necessary for my needs.

Originally I had planned to use olive green twill and dark green polyester lining with brass eagle buttons and make the jacket myself. However, I made a mistake in cutting the pattern pieces out. I told myself not to make that mistake and I went ahead and did it anyway. Instead of buying more fabric and potentially making the same mistake again, I found a vintage Eisenhower jacket on Etsy. The Eisenhower jacket is the model for Peggy’s jacket; the only difference is most Eisenhowers were made with the buttons and waist belt going to the right (Peggy’s go to the left which is the more feminine style). It was one deviation I could live with for the sake of my sanity. The only thing I had to do to the jacket once it arrived was add the brass buttons…

IMG_7986 Fixed…or so I thought. Since the Eisenhower was a vintage and used piece, it had some damage. The seller did mention damage in their listing but was not specific in details. Most of the damage was confined to the sleeves with tiny holes in the shoulder and upper arm areas. Also the sleeve edges were worn and had holes. The most significant hole was on the left sleeve around the elbow area. I didn’t worry myself over the tiny holes since they weren’t too noticeable. The sleeve edges I managed to fix by shortening the sleeves to a more appropriate length for my shorter arms. The hole on the elbow was more problematic; I managed to sew it closed but it’s still very visible. Since I don’t plan on entering any craftsmanship competitions with this, I can deal.

Also the shoulders are HUGE on me despite this being one of smallest sized Eisenhowers I could find. =/

The shoes are from B.A.I.T. Footwear (not shown), the company that makes Peggy’s shoes from Agent Carter. The style is Roberta in tan. I had to go up in size since I have wide feet so they are a little long but oh so cute and fairly comfortable. They are not the exact shoes, as I need shoes with straps (I don’t walk well in heels without straps to hold them on). But they are brown and vintage inspired, which is appropriate for Peggy.

IMG_7988The S.S.R. pins and airsoft gun (also not shown) are from sellers on eBay. They are the perfect props, and the airsoft gun looks just like a Walther PPK – the type of gun Peggy (and James Bond) use.

So, my first Peggy Carter cosplay is officially complete. Next up is her red dress, which I already have all the materials for. 🙂