Frozen Fleece Vests

I decided I needed more layering pieces for winter this year. I also decided I wanted the pieces to be made of fleece. The pieces also needed to be something I could take and wear with me to a NYC trip this year and a Disney World trip next year. So of course it had to be Disney themed. And what more appropriate winter theme than Frozen?

Frozen themed fleece is difficult to come by. I tried getting some from Joann Fabrics online but they sent me an email that they had sold out. Some places online such as Etsy had different fleece, but the sellers were asking more than retail. Hancock Fabrics, however, came through. They had about four different kinds of fleece when I visited. I ended up getting the last of their Elsa themed fleece (1.25 yards) and 2 yards of their Anna themed fleece. I used Simplicity 1499 for both vests.

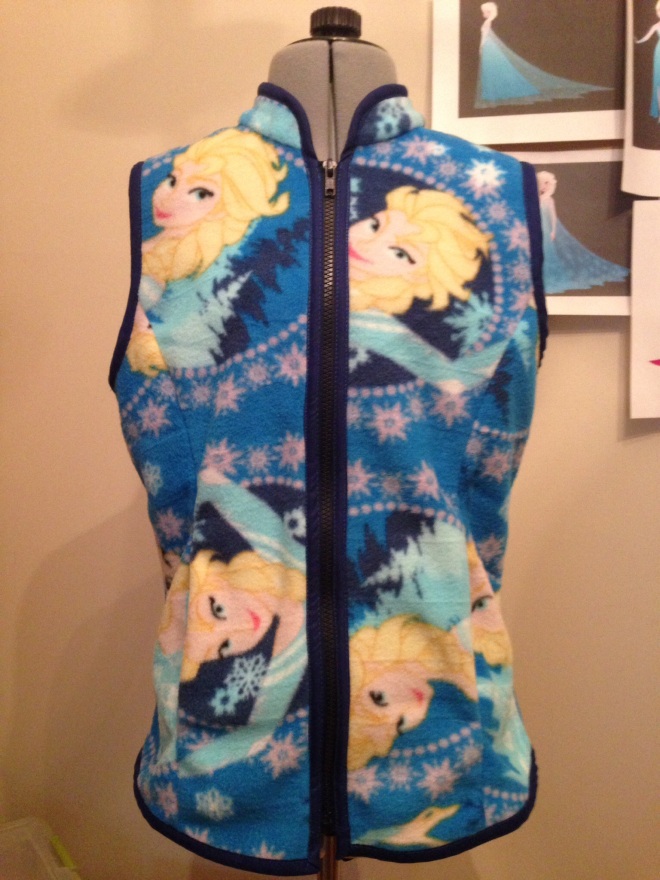
Elsa’s fleece is big and bold because of the print so I don’t wear it out in the open as often despite how much I love Elsa. Usually it’s just used as a layering piece. The fleece is plush and warm. It’s single layered except for the collar and zips up the front. There are pockets but they are kind of small and do little more than warm my hands.

image

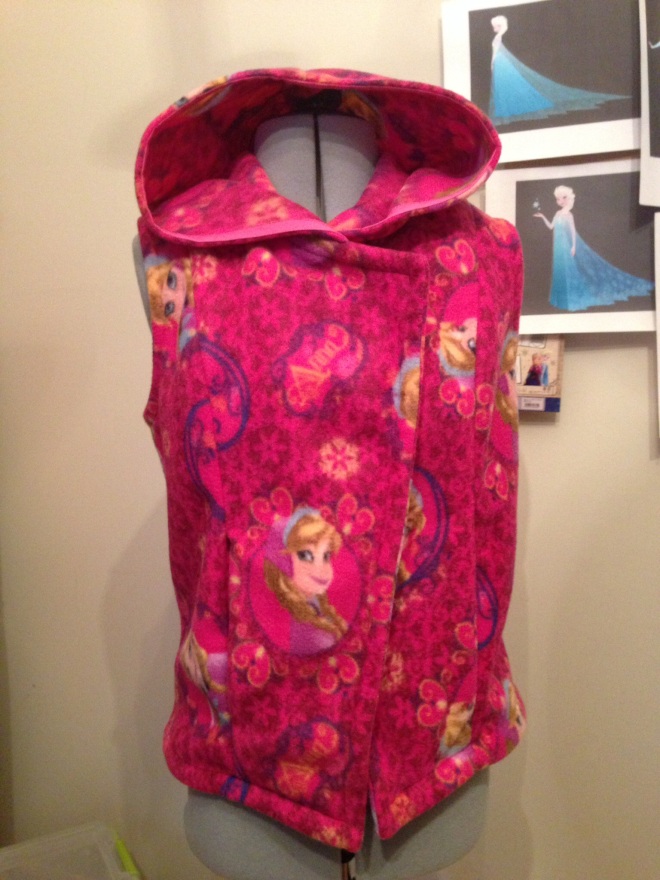
Anna’s fleece is hands down my favorite. The print is cute but more subtle, and very berry pink (not bright or pastel pink, which looks awful on me). The front folds over and is a total of four layers of fleece so it’s SUPER warm and cozy. The original pattern called for a collar and zipper, but I replaced those with a hood. I am currently looking for a button or clasp for those times I want to close the front.

image

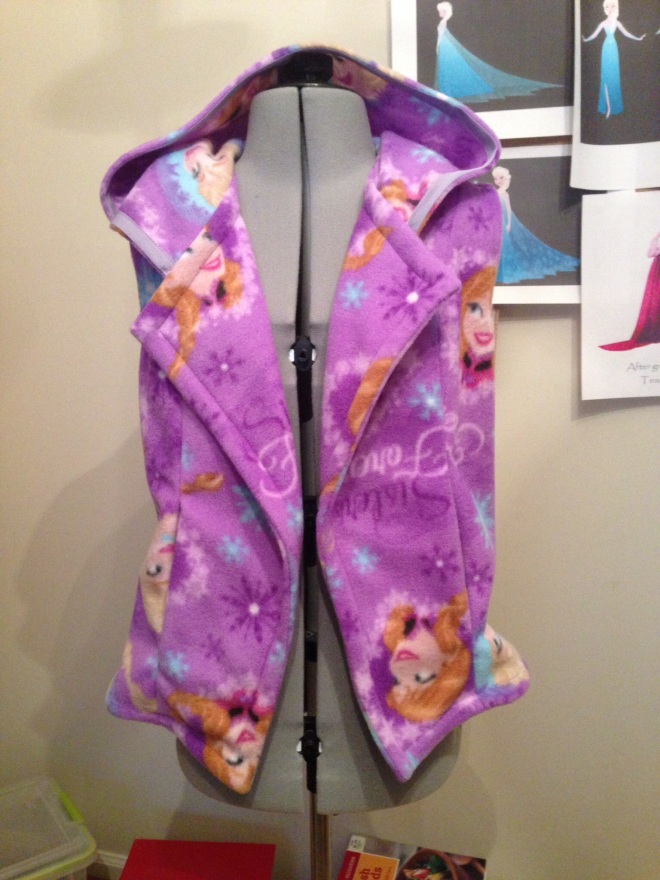
I completed both of these a week and a half ago and wore the Anna vest to the Carolina Renaissance Festival, and to a later trip to the local Disney Store. This morning I went to Joann Fabrics to get supplies for my Anna winter cosplay when I find two more Frozen fleece patterns. Knowing buying both would be too crazy, I bought the Sisters Forever purple fleece and made a second hooded vest.

image

I love all of the vests, but I have had the most fun wearing Anna’s fleece; it got so much attention when I wore it. People love the style of it; some, when they realize the print, love it even more. First time I wore it to the local Disney Store I had a cast member freak out over it. She demanded to know where I bought it and was a mixture of surprised and disappointed when I said I made it. I told her I made it because there was a decided lack of adult themed Frozen items, to which she nodded and proceeded to steer me towards all the adult items they had.

Despite buying exactly what I needed, I have about half a yard of each print left over. I turned the Sisters Forever remanent into a pillow case; considering making a double sided body pillow out of the other. And I’m hoping I don’t find anymore prints otherwise I will be in some trouble.

Elsa Ice Dress

Halloween is five days away! What are your plans?

Normally I don’t dress up on Halloween. I work as a science teacher; most days are spent either teaching labs or prepping for said labs. My cosplays are not exactly lab friendly as you might imagine. This year Halloween is on a Friday. I don’t have classes on Fridays so dressing up is kind of a wasted effort.

BUT! My city is kind of small and the downtown businesses still do trick-or-treating for the kids. So I thought this year I would take the opportunity to dress up and walk the streets, without having to worry about getting home in time to get ready for work the next day.

I told myself I wasn’t going to make Elsa’s ice dress for a good long while because it seems like EVERYONE is making one. I love Elsa – I practically am Elsa – but I didn’t want to be known as one of those “weird Frozen obsessed people.”

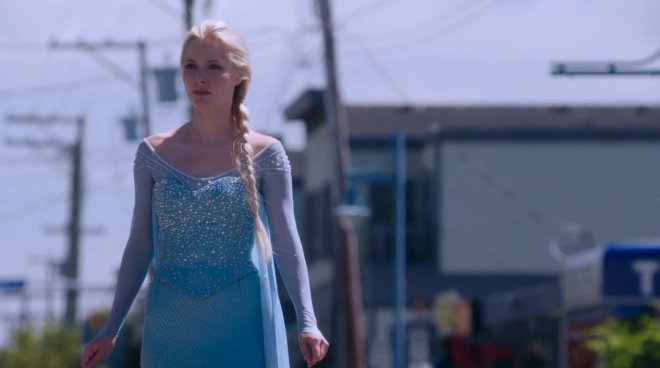
But then I saw the new season of Once Upon A Time…and I fell in love with their version of Elsa, played by the lovely Georgina Haig. While I love the costume design in the movie, there are elements on the OUAT version I also love. Since I decided to cosplay Elsa in her famous ice dress for Halloween, it was a good time to figure out how to combine elements.

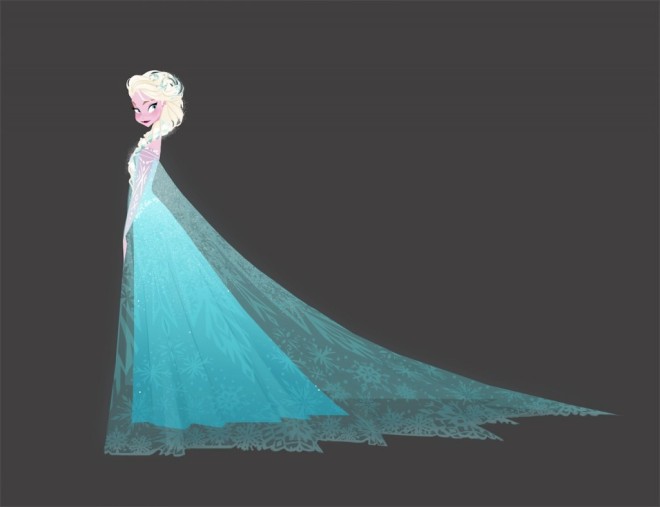
I am in love with the concept art by Brittany Lee so I took most of my references from the Art of Frozen book.

frozen6-small-1024x787What I love most about movie Elsa is her gorgeous sheer cape and the shape of her dress. At lot of cosplayers make her dress very straight (which is perfectly fine) but I love the slight train she is supposed to have. I also love the look of falling icicles in the skirt. I managed to find fabric on Etsy that mimics the skirt (which saves me a lot of heartache in searching and failing in my local fabric stores). I also managed to find – much to my delight and relief – another seller on Etsy who was selling pre-printed cape fabric; saves me the time and frustration of figuring out how to get the design on. (At one point, however, I do play to make a longer cape which means I will eventually have to figure out all those designs. Not today though.)

Screen-Shot-2014-08-24-at-8.36.31-PMWhat I love most about OUAT Elsa is the simplified sleeves and the bodice. While the sleeves lack the X shaped design on the elbows and the neckline is more simplified, the fabric is much more sparkly by nature. Again, I found sparkly stretchy fabric on Etsy so all I have to figure out is the neckline (Do I want a string of rhinestones to make it easier or hand bead the neckline? Decisions.) What I love about the bodice is the transition between round rhinestones at the top to the more icicle like look at the bottom to blend with the skirt. The costumers of the show seem to use the same fabric for the bodice and skirt. Mine is different so I plan to make the same transition with rhinestones in two sizes getting less and less dense towards the bottom.

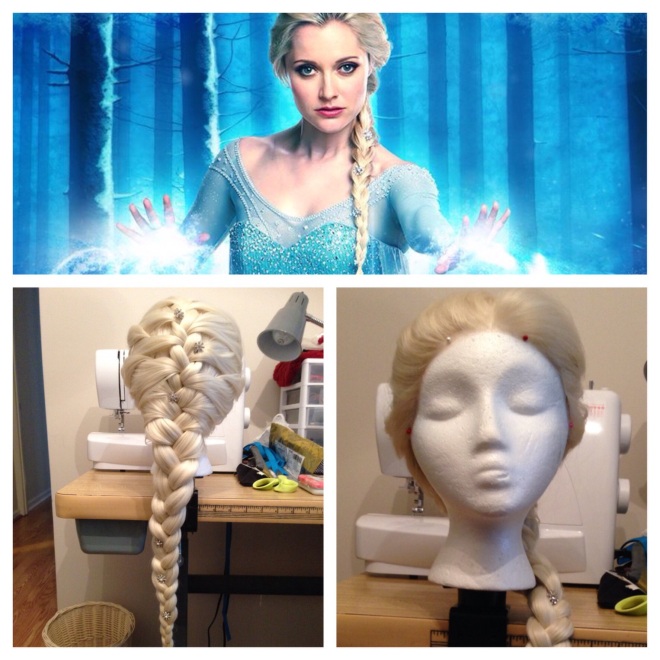
I also love the much more simplified braid in OUAT so my wig is a whole lot easier to style and manage. To make the wig, I started off with a Dany style wig from Arda Wigs in the titanium blonde color. I sewed in wefts from another blonde wig (that surprisingly had fibers of the exact same color) to make it a little longer and fuller. Since Dany is a single length wig, I made a few long bang cuts but then opted to braid those in to better match OUAT’s style. The rhinestone snowflakes are 6 rhinestone buttons either attached straight to the wig or to blonde colored bobby pins.

imageThe bodice is made using the same pattern as my Elsa coronation bodice, Simplicity 1499 (I have plans to make Anna’s coronation bodice with the same pattern; it’s so universal). It’s made in three layers: one layer shimmery teal blue lame fabric, one layer non-stretch white twill (to stabilize the lame), and one layer cotton fabric with Frozen print. There is light boning and a lace up back. Unlike both movie and OUAT versions, I opted once again to make the bottom front rounded rather than pointed. I used the rhinestones to create a transition like effect; more rhinestones at the top and gradually decreasing their numbers to the bottom.

image

The skirt is a shimmery light teal viscose material. Originally I had intended to make it part of an underdress. However, once I was finished it was difficult to zip the dress up past the waist because of all the fabric. Since the bodice goes below my waist, I opted to turn the dress into a skirt instead. It’s difficult to see, but there is a slit on the right side that goes to just above the knee – like Elsa’s slit. (Also, it’s really difficult to photography the skirt fabric; it’s so pretty and shimmery but just doesn’t show up well in pictures.)

image

The shimmery top is made of a semi-stretchy material with blue metallic threads woven in. I modified a raglan sleeve top to get the shape I wanted. Unfortunately for my first run the top looks great but is a pain to get on and off without contorting my body and over stretching the seams a little. I also could not add on the pretty chained rhinestones otherwise I lose the stretch factor. I plan to remake the top in the same material but have a back opening (non-accurate but easier on and off).

The cape is attached to a length of teal bias tape then attached to the bodice by 8 snaps. It goes to just under the arm; my second cape I intend to come up around the bust, which is more accurate to the movie’s version.

image

My shoes (not shown) are a glittery blue jelly wedge heel I got from the UK off eBay. They have a Mary Jane strap and are surprisingly comfortable despite how they look. They are not accurate but Elsa’s shoes would fall off my feet without the strap…if I don’t fall and break my ankles with the stiletto like heels.

Overall I am very happy with the outcome. There are some parts accurate to the movie, some parts accurate to the show, but a bit of it is my own interpretation. I’m really glad all the colors, fabrics, textures, and designs mesh very well. I can’t wait to wear it but I’m slightly nervous too. I don’t want to disappoint any child with my version of the costume. =/

Margaery Tyrell Dress

Lately all I want to make are Game of Thrones cosplays.  As impractical as they are for everyday life, they are gorgeous in construction.  One of my favorite characters, as you all know, is Daenerys Targaryen.  But, as I began to watch season 3, I started to really like Margaery Tyrell.

It kind of helps that I simply adore Natalie Dormer as Jaime Moriarty in Elementary.  😉

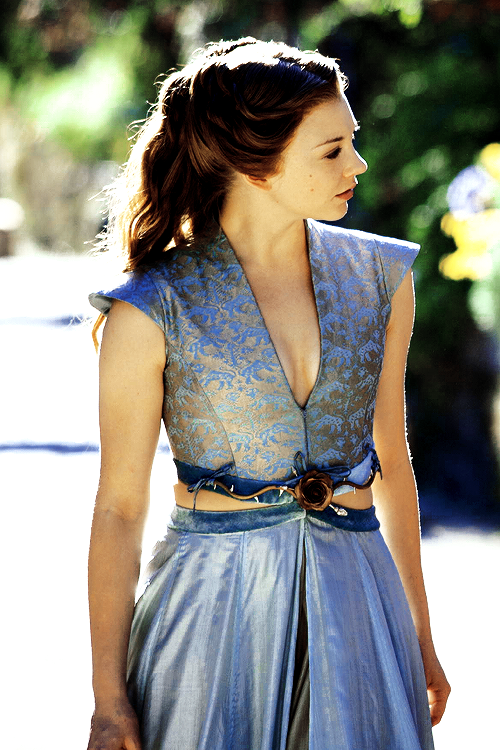
I cringed at Margaery’s clothes from season 2 since most of them were a bit too revealing in the front for my taste.  But her season 3 outfits, while still a little revealing, are less so – and mostly in the back.  The dress I really fell in love with was  the one she wears when she is consoling Sansa Stark after Sansa’s engagement to Tyrion Lannister.

tumblr_mv9ww4Xy121qgf468o1_500

The open sides and not-so-low neckline were appealing to me, as was the design of the top and rose belt.

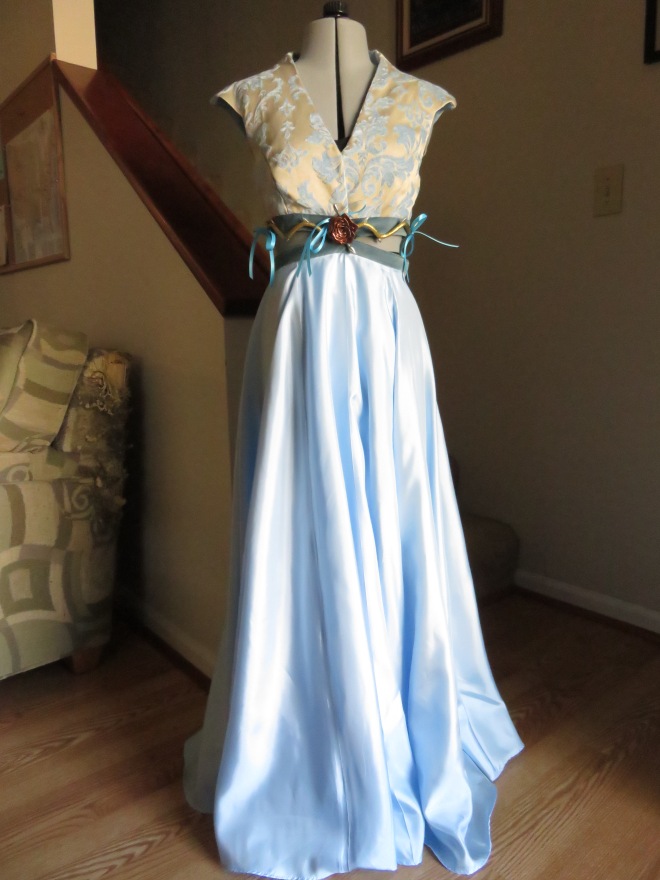
I crafted my dress using McCalls 6941. The skirt was kept basically the same, but the top was modified using a muslim mock up to be cropped, have a closed back, and a closer to the neck collar.

I used baroque satin for the skirt. It is my least favorite satin to work with since it is cheap and overly shiny, but it was the only satin that came in the color I wanted. To tone down the shine, I used the back. Margaery’s skirt is two layered but I didn’t want to deal with excess weight since this is being worn at an end-of-summer con. Instead, I have a separate cotton underskirt whose only purpose is to make sure I don’t have an unwanted silhouette when the light hits the skirt just so. The waist band is made from a teal colored cotton velveteen.

The top is made from upholstery weight fabric in a tan blue pattern and blue cotton lining, also trimmed in cotton velveteen. Margaery’s top has a criss cross pattern on the back, but the back of my top is simplified; I didn’t want to deal with the frustrating of figuring out the criss cross. It closes in the front with four hooks and eyes. The skirt is attached to the top by two heavy duty hooks and eyes.

IMG_0357

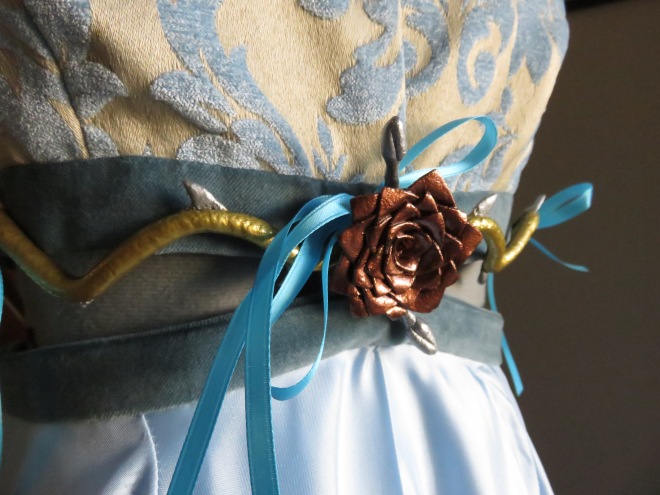
The rose belt is made freehanded style using worbla and acrylic paint. The paint is in colors bronze (for the rose), gold, and silver. Two primer coats of Mod Podge gloss spray, 5-8 coats of paint, then finished with 4 coats of Mod Podge to seal. I purposefully omitted the gesso and sanding priming step most cosplayers use when working with worbla; I wanted the knobby, uneven look, as if a real rose and its stem had been dipped in metal. The belt attaches to the top waist band with three blue satin ribbons hand sewn to the top.

IMG_0359

I was really enthusiastic about making this dress – that was before I started work on Elsa. After I finished Elsa, my motivation just stopped. It was a struggle to finish Margaery in time. It’s not 100% up to my acceptance level but it’s function, fits, and everyone can recognize it.

DIY: Large Shirt to Tank Top

A couple of weeks ago, I made the decision to get fit. I’m at a pretty good weight and size for my height so weight loss isn’t the goal. The goal is to be toned. The vanity in the decision is that I have three superhero cosplays to make for next year’s Heroes Con. While the ladies are covered but, the fit of their clothing leaves little to the imagination. Plus, I want to look the part of a superhero.

I started the new plan 4 days ago. I had to wait because I had minor back surgery to remove some epidermal cysts and the stitches needed time to heal. My plan is simple: eat healthier, drink more water, work out every day. I started a train for a 5k running program and have also incorporated visual workouts by Neila Rey on days I can’t run. To make sure I stay motivated, I am keeping a blog entitled Team Sparklefists where I am documenting what it is I am doing weekly, how well or not so well I am achieving my goals, and also talking comics. So far I have been mostly successful, which I’m very happy about. My tummy has slimmed down a bit and I can feel my legs growing stronger. Gotta work the arms and back but the scars from the surgery need another 2-3 months to heal before they withstand anything substantial.

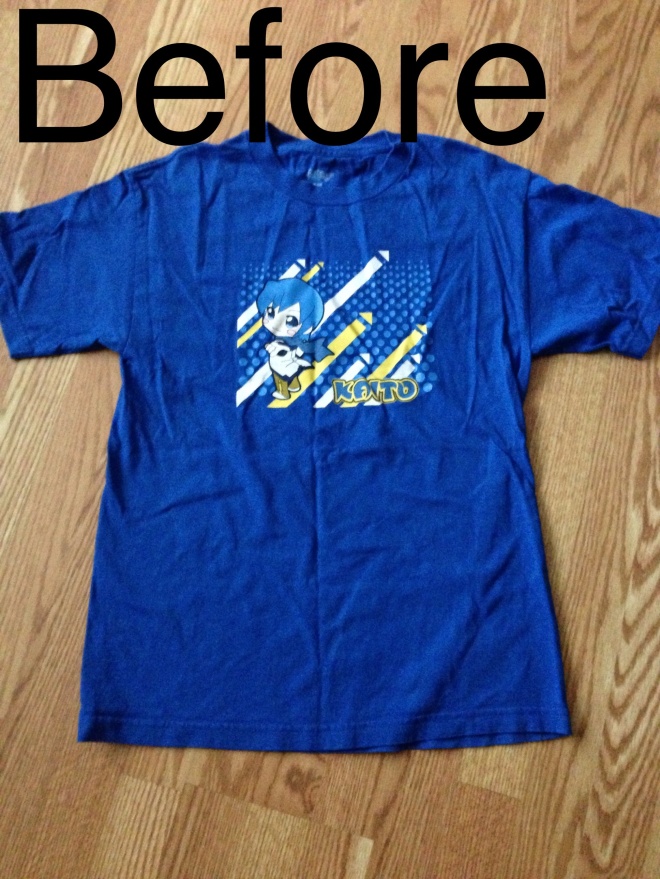
In starting this new workout, I find myself lacking in clothing. I have two pairs of skort capris (capris with skirts attached), one pair of yoga capris, a skirt cover up, one short sleeved shirt, and one tank top. THAT’S IT. While I can get by with the capris, my tops need work. But I can’t spare the money to buy tops because work out gear is expensive. Even the $20 it takes to by regular tank tops is making me cringe. So I scoured my closet and found two tees – one too big and one too small. I decided to make them into tank tops.

image

I started with the large tee. I have had this tee since 2011 and wore it a few times for sleeping. I don’t know what possessed me to buy a men’s medium; I haven’t worn oversized shirts this large since I was in high school. It’s been sitting in the closet for a good year and a half. I decided to attempt to make it a racerback tank using various no sew tutorials on Pinterest.

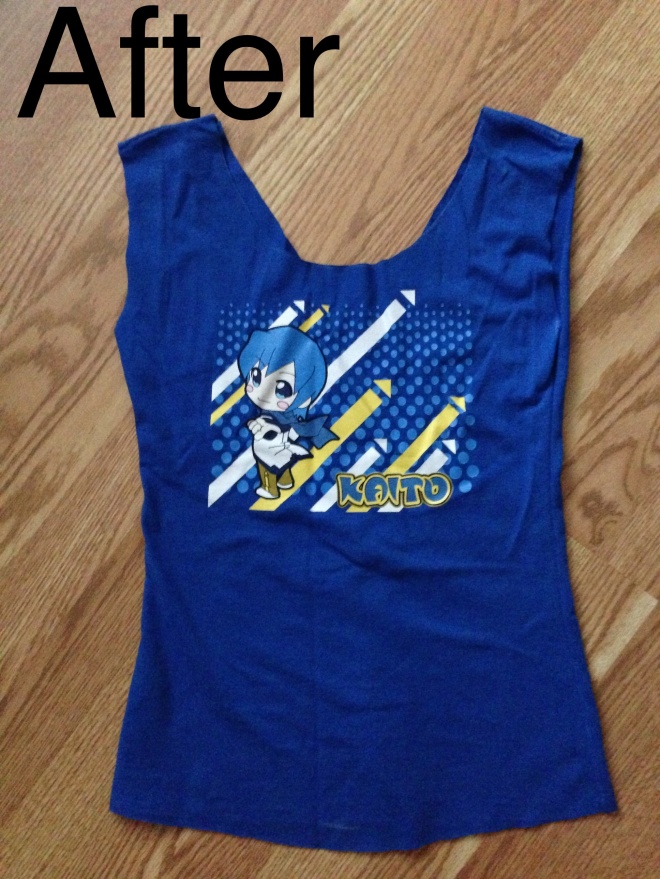
I cut the collar down to where I wanted it and cut off the sleeves. Since the sides were too wide, I decided to slim those down about 3 inches on each side. THAT was a mistake since now the tank was fitted and wouldn’t accommodate the racerback style in the way I was making it. So instead I cut a deep V in the back and cut off about 3 inches off the bottom.

image

So it wasn’t what I wanted originally, but it’s still a decent tank and more sized to my body. The edges are raw and after some debate I decided to leave them that way. It’s just for working out/running so it’s going to get filthy and messed up anyway.

I haven’t started on the other too small shirt yet since I need to get some purple stretch jersey. But soon. 🙂

Elsa Coronation Dress

EDIT: I’ve gotten a lot of inquiries asking if I would make this dress again – with and without the embroidery details – for other people to purchase from me. Sorry everyone but the answer is a firm no. This dress is very special to me because of the amount of work and love I put it. I won’t be able to replicate the same level of detail because a commission would force me into it.  I also do not do commissions in general because I do not have the time and energy to devote to such a large project again.


I’m one of the last of my friends to jump onto the Frozen bandwagon.  For all of its faults, I still rather like it.  Elsa’s character and her song “Let It Go” really speak to the introvert, easily irritated person I can be.  I can relate a lot to Elsa since our childhoods were similar: concealing your real emotions, hiding them away from the outside world.

The cosplayer in me really wants to make and wear her Ice Queen dress.  But so many people have done it so far that I am waiting for the hype to die down a bit. Instead, I picked another of her dresses to make: the coronation gown.  Even after I chose to make this dress, I’ve been hesitant about it.  I always said I wanted the bodice to be more corset like and the design embroidered, neither of which I have a ton of (good) experience with.  But cosplayers like challenges, don’t we?

Elsa_08At this point in time the costume is not 100% finished, but it’s been a while since I’ve posted so I thought I would show some progress shots.

The black part is cotton sateen and the base satin is a peacock blue.  It was really difficult for me to find an appropriate color for Elsa’s dress; every reference image I have changes slightly, some are more green tinted, others more blue.  Blue is my favorite color and more representative of Elsa so I settled on a peacock blue that, in certain lights, turns a greenish teal color and in other lights (like on my phone) turns royal blue.  The embroidery color keeps changing as well so I used colors that complemented each other and the satin (gray blue, reddish pink, magenta, sky blue, and purple).

I’m all for accuracy, but sometimes translating animation into real life is difficult.  Fabrics just don’t always come in all the different palettes and textures animation can create.

I decided to make the bodice an actual corset for a better shape.  The only downside to this is that the small back design has to be omitted. The bodice is made from a slight modification of Simplicity 5006 (mostly I omitted the center front seam but kept everything else).  The back is lined in sky blue stretch cotton sateen and is lightly boned.

The top of the under dress was made from a really old turtleneck pattern I own and Simplicity 1727 for the collar.  Darts (not seen) were put in the front and back to give the top shape and less bulk under the bodice.  The skirt is made from Simplicity 5235 (which no longer seems to exists).  The godet was omitted and the top cut off before the skirt was sewn to the sateen.  It closes in the back with a zipper and two hooks and eyes at the collar.

image

All of the embroidery is done by hand.  It’s not as neat as I would like, but I can’t justify spending money on an embroidery machine that I would use so infrequently.  Hand embroidery isn’t always neat so it gives the cosplay a personal touch.  The sateen was a lot easier to embroider than the satin surprisingly.  I bruised my fingers frequently attempting to pull the needle through without puckering the fabric too much.  In all the embroidery for everything (top, bodice, skirt, and cape) took me about 100 hours, half of which is just setting up for the embroidery.

The cape is made of fuchsia satin, dark purple satin, and dark purple velvet.  The top was made from a modified Archer pattern; the rest of the cape was draped and cut in scrap cotton before being cut in the satin.

image

Originally the Arendelle emblem was to be stitched in satin then the edges embroidered, but I was running out of time.  Instead I used freezer paper, sketched the design on, ironed it to the  cape, and painted in Jacquard Lumiere textile paint in magenta.  It came out great (I’ve been told it doesn’t look like paint but heat and bond) except for the edges.  To hide them, the edges are being stitched in pale pink embroidery thread in a simple stitch.

image

I only did the main emblem design for time sake.  I have all the designs for the cape edge sketched out.  I decided to omit them for time’s sake, but also because they are not always seen.  The edges are most obvious in concept art; they only appear sporadically in the film.

The crown is made of two layers of worbla with a layer of craft foam in the middle.  I attached it to a plastic headband but am contemplating cutting off the ends (it squeezes my head without the wig on) and adding hair combs/clips instead.  It is currently awaiting gesso priming and painting.  A vintage rhinestone will be placed in the center.  The brooch is also made from a vintage rhinestone, craft foam (for backing), and worbla.

image

I started this project around March 25 and hope to finish it by the end of next week (April 16).  It’s probably the most involved costume I have ever made simply for the time and all the techniques used.  It looks great on a dress form so I am very hopeful it will look good put together.

The Mechanic and the Companion

I told myself I wouldn’t add more cosplays to my list…then I went and added Qarth Daenerys and Margaery.  I swore I wouldn’t add more than that…yeah, right.

I am late to the fandom, but I finally have jumped on the Firefly/Serenity bandwagon.  I had seen the movie but understood little of it since I hadn’t seen the series.  I decided to finally watch it on Netflix, if only to understand all the Firefly references that pop up on Castle.  Once I watched it…well, cosplay wasn’t a far stretch.

I love all the female characters on Firefly.  I love Zoe, Inara, Kaylee, and River all for different reasons.  It’s difficult to pick a favorite; I think I’m a toss between Zoe and Inara.  Since two of my best friends also love Firefly, I made the executive decision that we were going to cosplay from it.  I would have made Shannon be Zoe, but she is not the cosplaying type and would rather be regulated to bag holder.  Holley would love to cosplay Firefly but doesn’t sew.  So that left me to do all the sewing and wig styling…and I’m okay with that.

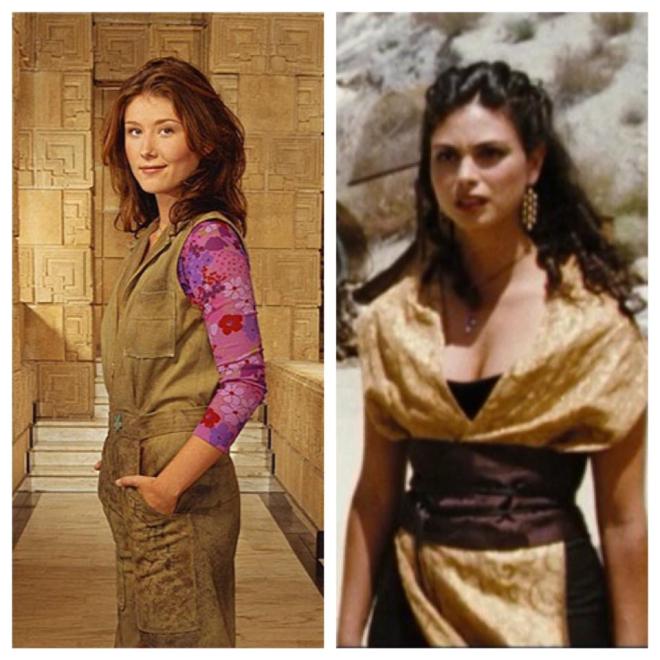
It was easy to decide on the costume for Holley since her favorite character is Kaylee.  But what would I cosplay?  Originally I thought of River, but I am too attached to Inara’s pretty costumes…but I had to find one I was comfortable in and didn’t take a lot of research to figure out.  I ended up deciding on her gold shawl and black pants combo from the Serenity movie.  It was not overly difficult but still elaborate for Inara.  Plus I had black sateen, the gold flats (from Daenerys and Margaery) and the black curly wig (from Katniss and Snow).

1898207_276155749175585_1390910635_nI started with Kaylee, and the first thing I did was to purchase the paper parasol from ThinkGeek.  Next was the shirt.  It was near impossible to find a decent replica, so I settled on a floral knit with big roses and Deer and Doe’s Plantain pattern.  It’s a pretty pattern, but the knit fabric was thin and unraveled very easily.  It stretches but then wrinkles when it bounces back.  I also somehow managed to sew the front piece backwards but it’s not completely noticeable.
imageThe coveralls was a combination pajamas top and bottom modified slightly with a strip of fabric for the waist.  There are some pleats in the top part and gathers in the back of the bottom to accommodate a woman’s hips and bust.  It’s a bit snug around the back when the arms are flexed around the chest, and a snug at the waist.  Neither is uncomfortable, but I keep making these slight mistakes and not knowing how.  One day I will learn.

imageMy mother actually did all the character writing using a black fabric pen.  I distressed the coveralls a little with sandpaper and faded some spots with water and a high steam iron setting.  I attempted to stain them with soy sauce, which only worked minimally; going to try later with some watered down black fabric paint.  Here’s a close up of the bear patch with the character for love.

imageMy mother and I had this somewhat semi-heated argument over the characters.  I wanted her to write them at slight angles since Kaylee’s are not exactly straight.  However, the manner in which Asian students are taught how to write has them repeatedly write characters in a very straight fashion.  I think I ended up confusing her and had to turn the coveralls in the direction I wanted the writing to go.  There was also some debate over the characters on Kaylee’s left pocket.  It is notoriously known that the characters on the left pocket are backwards/upside down so it didn’t matter if they made sense.  I had my mom write the characters for Serenity and paused the DVD so she could see them.  She proceeded to grumble about how the characters “don’t go together and make no sense” while writing them to please me.

I love my mother for putting up with my hobbies. :3

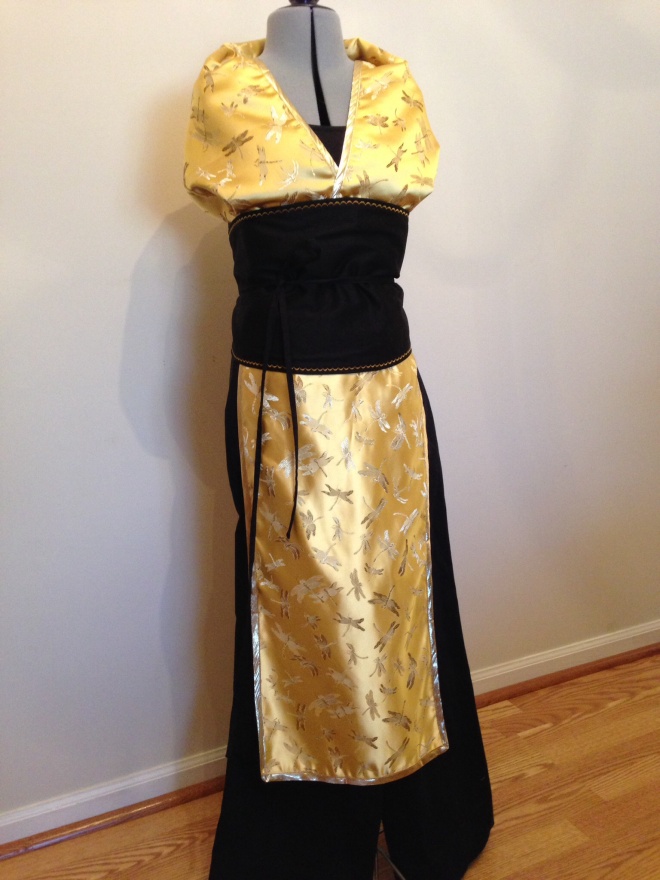
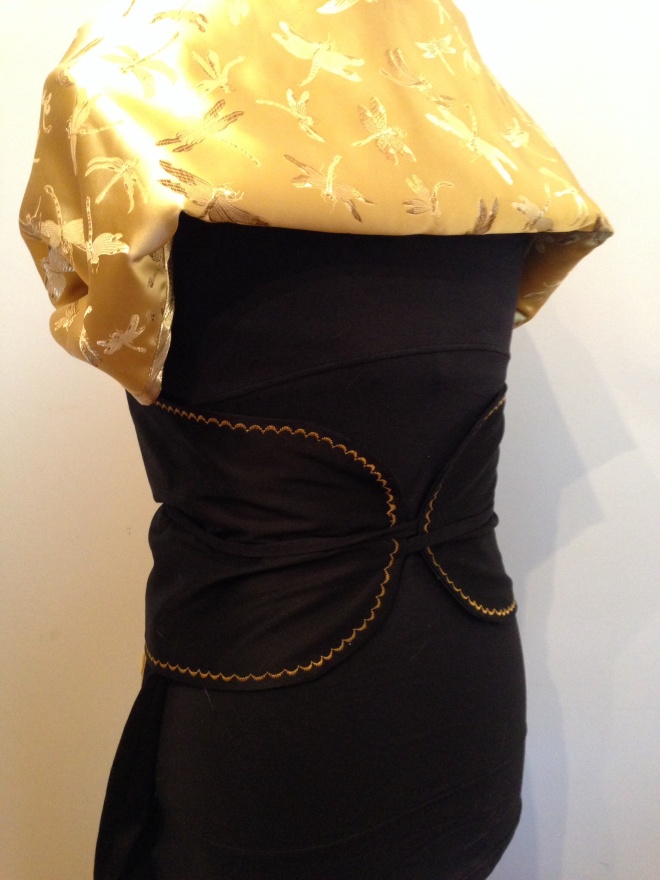
Inara was a bit more simple (not that Kaylee was overly difficult compared to other cosplays I have done).  I used a wide legged pants pattern and black sateen.  I used more of the black sateen for the faux obi belt which I drafted by draping and cutting; I used a scallop edge stitch in golden yellow to give the plain belt a little oomph.  A simple stretch control top cami is underneath as the tank top.  The gold shawl/wrap is dragonfly brocade (I could not find swirl brocade but the dragonfly one was gorgeous).  I made it in two pieces: one piece to wrap around the shoulders and then a separate piece for the bottom drape, all sewed to the faux obi and edged in gold lame bias tape.

imageFor the record, the shoulder wrap makes NO SENSE.  I don’t know what the costume department did for the movie, but it does not lay right.  Maybe I made mine too wide or the fabric is a heavier weight, but if I wear it one way I can’t move my arms but another way causes it to bunch around the neck.  I mean, look at it!

imageOh well…at least the “back” is hidden by the hair of the wig.

The most difficult thing about Inara was finding jewelry that could work.  But I managed to find dangle chandelier earrings and a double drop lariat necklace off Etsy for decent money.  Since this outfit of Inara has less make up than some of her others, I am opting for a mostly bare faced look with sparkly taupe eyeshadow, semi-heavy eyeliner, and pink tinted lips.

I’ve got a photoshoot in Kaylee to get pictures and figure out any kinks before handing it over to Holley. I’ll probably have another photoshoot with Inara in the near future.  These were probably two of the simplest cosplays I have ever made, time and construction wise.  All total, I probably only spent about 4 days worth of work on two costumes.  But they are going to be so fun, so comfortable, and so worth it to geek out with my friends.  I cannot wait!

Wrapped in Red

One of my goals was to complete the Effortless Cardigan.  I love cardigans (I think I’ve said that before) and this cardigan is especially fun because of the long front pieces you can wrap around.  I wanted to knit this in alpaca yarn (my current favorite fiber) and my local store had just enough Paca Tweed by Plymouth Yarns in a gorgeous red wine color (I later learned that Paca Tweed is discontinued so I got lucky).

The yarn is aran weight and the pattern called for worsted.  This resulted in the fit being fine but the length being longer than the pattern called for.  This suited me just fine because I was feeling like the body was too short for my tastes.  I feel like the sleeves are too short even though I knitted them an inch longer than called for, but I can’t be bothered to undo all my ribbing.

image

Speaking of ribbing…this cardigan had so much of it. I didn’t realize how long it was taking me to do the ribbing until I got to the collar part. Nearly 5 hours for 18 rows of 186 stitches. The bottom ribbing had over 200 stitches, and each side had 46 stitches. Needless to say, I am taking some time to rest my wrists and shoulders before tackling my next knitting projects (hats and cowls for gifts).

Blocking this was…interesting. Blocking always makes my projects larger than intended even when I am on target with gauge. I don’t overly manhandle my knitting either; I roll the project onto itself once to get out as much water as possible, then wrap it in towels and step on it a few times to get out excess water. I never wring or stretch the project while it is wet, and yet it still manages to come out larger than anticipated.  Maybe I should knit a size smaller next time?

image

It’s also a bit of a pain to block projects when you have cats.  I love my four legged babies, and Kulin is so good and leaves my projects alone.  But Kuro…if you don’t watch him, he will try to eat the pins and in so doing snags his claws on the stitches.  The night I first blocked this project, he kept me up half the time being a pain in my bum.  The next night I used our drying rack since the cardigan was dry enough not to stretch out.  Kuro has nearly ruined three projects this way.  Our spare bedroom doesn’t get air circulating enough to dry projects, and we hate locking him out of the bedrooms.  Guess I’ll have to keep finding ways to get him to behave (none of the usual techniques work on him).

I still love wearing cardigans, but I think I am done with knitting them. I still have 3 more sweaters on my to-do list but thankfully they are all pullovers.

Archer of the Diabolical Kind

A while ago, Peneloping posted about her Archer shirt. I went to investigate and discovered the pattern is by Grainline Studios. Needing a plaid shirt of my own, I purchased the pattern and set out to turn some red and black flannel into an Archer of my own.

Unfortunately the flannel was AWFUL to work with. It mucked up my iron on the low setting and kept shifting in the cutting process. I decided to scrap the project and turned the remnant into a makeshift draft guard for our front door. Still wanting an Archer, I figured a plain shirt might be easier and more versatile.
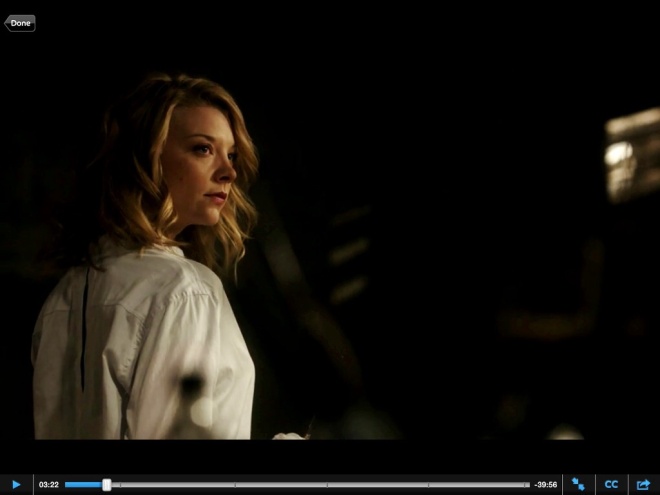
But then an idea struck me. I was completely enamored with the painter’s smock Jamie Moriarty (played by the lovely Natalie Dormer) wore in the opening of the Elementary episode “The Diabolical Kind.”

image

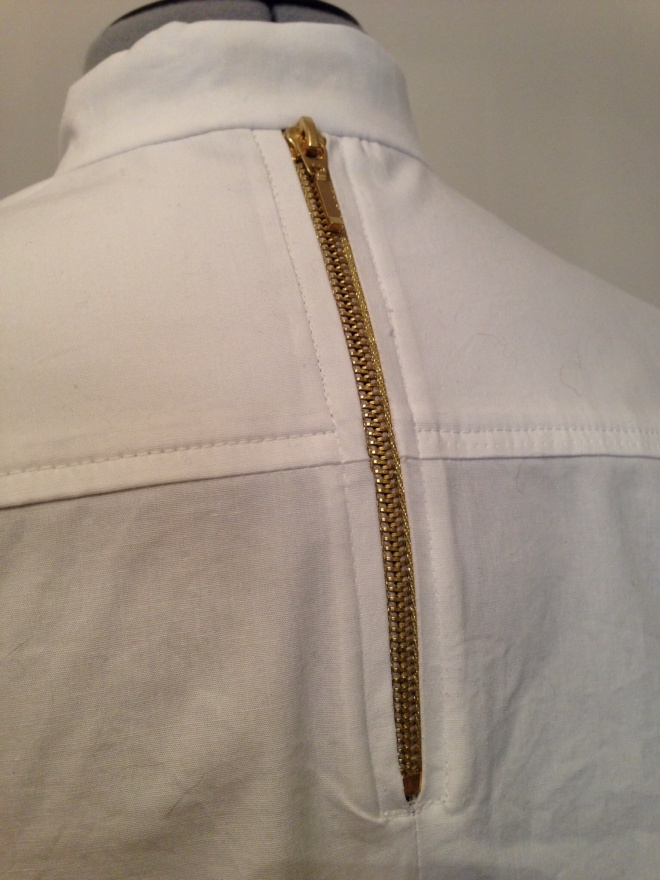
Not much is shown about the shirt except that there is a zipper in the back, it has a mandarin collar, and is long (almost to the knees).  The sleeves are rolled/pulled up so no telling if there are cuffs or what kind, and she wears it unbuttoned with plain buttons.  Nothing overly special about the shirt, but I adore the zipper in the back. I had to have it.

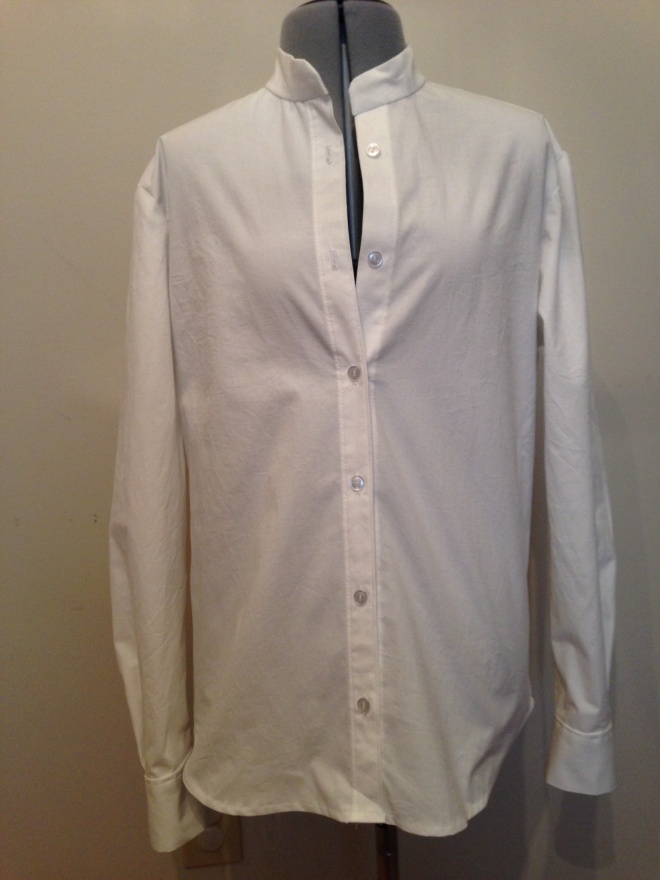
A trip down to my local fabric shop had me purchasing some plain white stretch poplin and a gold metal zipper. I knew I didn’t want the long length of the shirt so I kept the length of the size 2 Archer. I also knew that my personal style meant the cuffs would be rolled up 99% of the time so I wasn’t too concerned if I messed them up. Luckily Grainline gives wonderful instructions with its pattern so figuring out the cuffs and the plackets was easy.

image

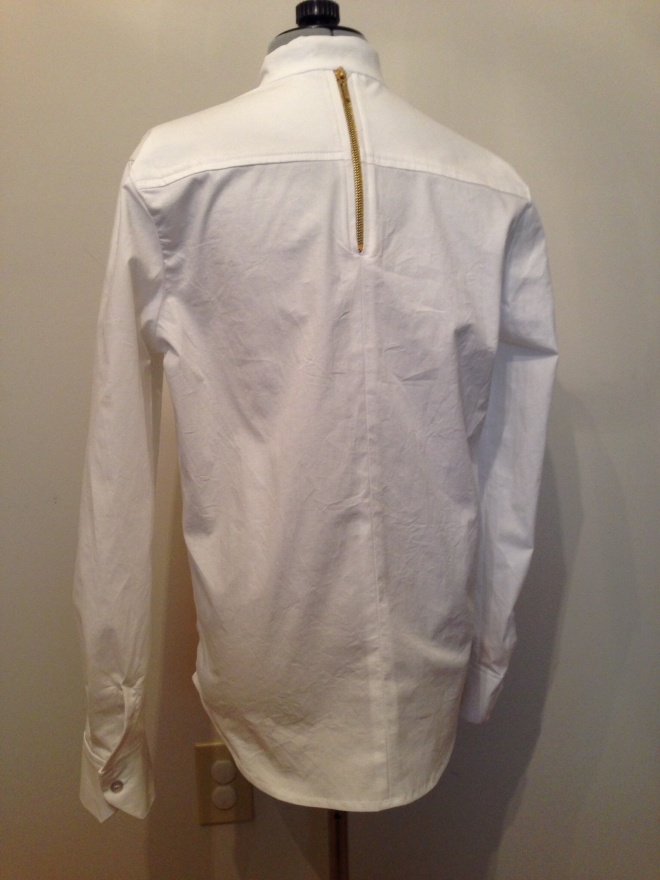
I made a few modifications to the back to accommodate the zipper (omitting the pleat and adding 1/2″ to the yoke to fit the zipper, and omitted the main collar piece. The shirt took me about 6 hours, start to finish. It came out lovely, very simple in the front but then the zipper pops in the back.

image

The zipper is fully functional, but is more decorative than useful as it does nothing but open a gagging hole in the back.

image

I intended this project to be a more “inspired” than “replica” since I have no intention of cosplaying Jamie Moriarty. I wanted this to be a usable piece in my wardrobe with an interesting detail. If someone recognizes it, great but at least I know what inspired the shirt.

I find I really enjoy Grainline’s patterns.  I want to try their Moss skirt pattern since I have an awful time finding such skirts to fit my hourglass shape. Plus, I found a wonderful black on black embossed corduroy in my search for the poplin I really want to work with.

Next, however, I think will be a copy cat of a Modcloth dress, again inspired my Peneloping’s version. 🙂

Swirls and Twirls

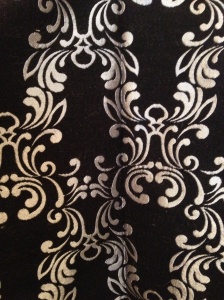
There was this one day I was in the fabric store. I can’t remember what I went to buy, but as I was walking the aisles of fabric bolts I came across this beautiful black and silver reversible brocade.

image

It was calling to me, but it was expensive so I resisted buying it for a few weeks. Eventually I broke down and purchased 1.5 yards not knowing what I was going to do with it. I had the notion to turn it into a skirt but didn’t know what kind.

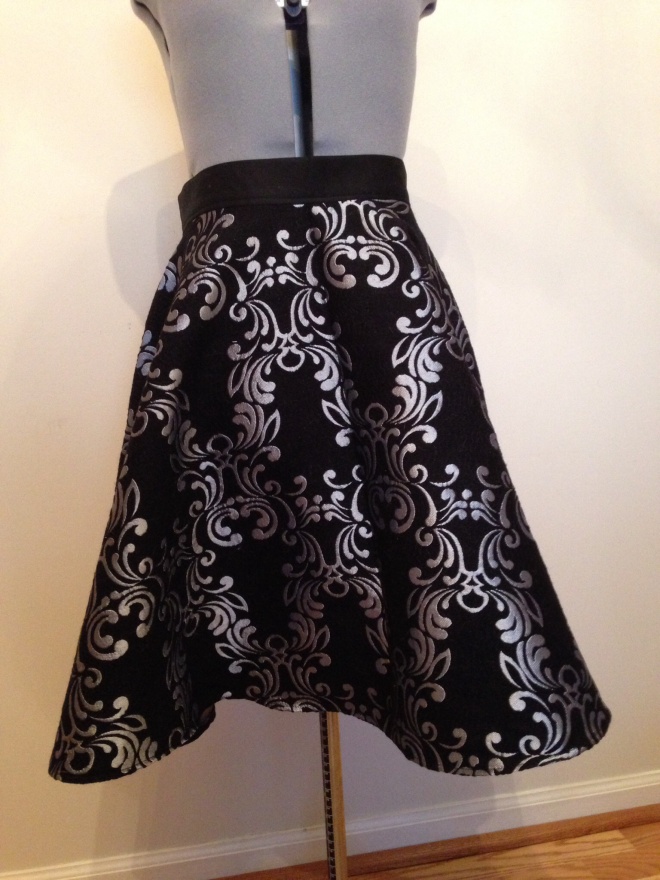
The pattern is quite intricate so the skirt had to be simple. Nothing with pleats or anything fancy. I ended up deciding to turn it into a circle skirt. After searching the web and viewing various tutorials on how to make a circle skirt without a pattern, I decided to give it a try.

It took about two hours and just a little bit of fudging but I got it right.

image

It’s nice and swishing and has a beautiful drape. It is a little fancier than most fabrics or clothes I wear but I think it would be able to spruce up otherwise plain outfits.

I didn’t photograph the back but I used an exposed metal zipper as a closure.

The brocade is the perfect weight for cool weather, and the color is ideal for fall and winter.  It’s just a tad too cold right now to wear it (at least until I find some warm leggings to wear with tights).

And thus my first circle skirt of the year is complete. If I never get around to making another, at least I filled another of my New Year’s crafting resolutions. 🙂

Three Cardigans For The New Year

Before 2013 ended, I finished knitting two cardigans by Andi Satterlund and was in the process for finishing a Ginny Weasley inspired owl cardigan. I didn’t call any of them “done” since I didn’t block them. Each of them has a lovingly made mistake somewhere that just goes to show how imperfect of a knitter I am.

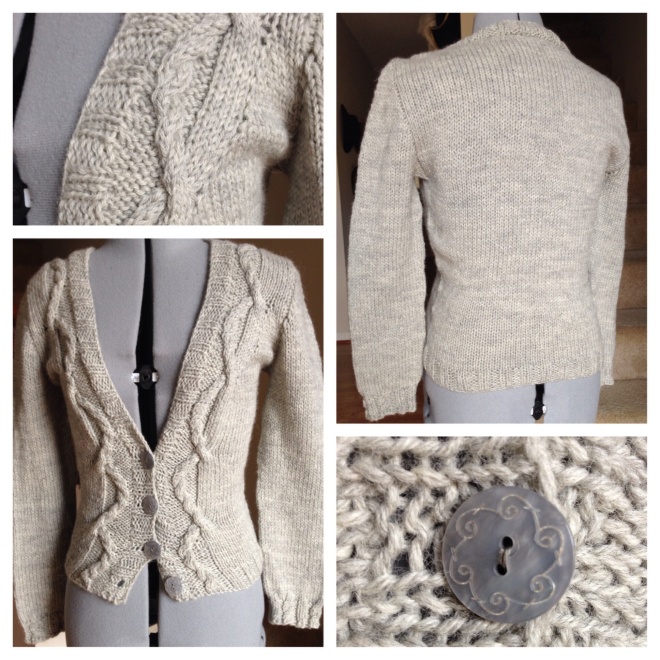
Marion is the first cardigan by Andi that I completed knitting in September. I used Knit Picks Wool of the Andes in Dove Heather. The yarn was originally intended for a Hermione fair isle sweater but I frogged the project.  The bottom band and neck band were completed before I discovered the wonderful thing known as a stretchy bind off.  I also made one tiny mistake in the cabling on the right side but it’s not very noticeable. I plan to knit Marion in a lovely yellow at some point.

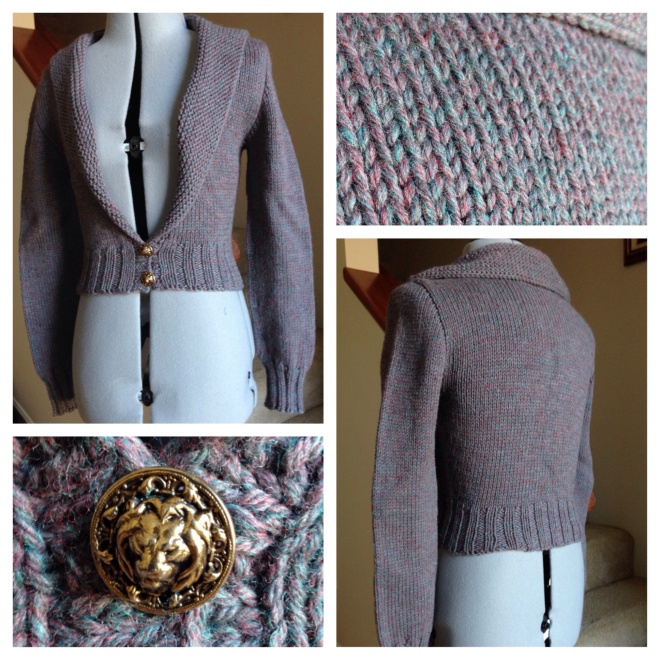
imageHortencia is the second cardigan by Andi that I started and completed in November. It was actually done as a test knit for her pattern.  Knit in Cascade 220 Heathers in a lovely shade of dusty purple, it’s a cropped cardigan with full length sleeves and a collar. I have the perfect dress to wear with it, and the heathered yarn makes it lovely to pair with other pieces. The mistake in Hortencia is in the collar; somewhere on the left side I picked up two stitches in the same place resulting in a hole. However, due to the wide collar the hole is safely hidden from sight.

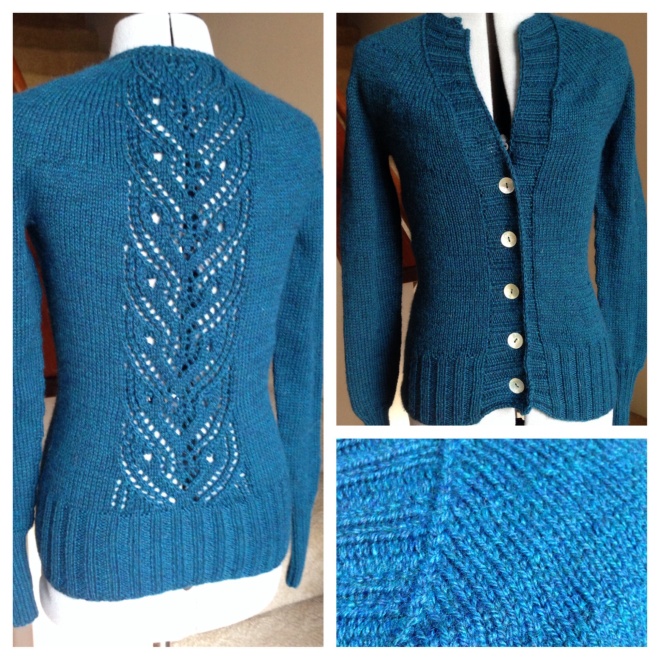
imageGinny’s cardigan is knit from Berroco Vintage DK in a dark teal color. I picked the yarn for it’s washability and it’s color. If I had to go back and do it again, I think I would have chosen Berroco’s Ultra Alpaca instead since the nylon strands in Vintage DK felt “weird” in my hands (I find I am more of a wool/alpaca blend kind of girl).  I make a mistake on the third owl from the bottom, but it’s not very noticeable. I left off the decorative pockets since they are not very functional in their small size (I need functional pockets). Blocking this was a bit of a pain since the Vintage DK contains nylon and acrylic, neither of which blocks very well.

imageIt took me so long to consider these cardigans complete because I have been adverse to blocking. It’s not as bad as I thought it would be, but wool/wool blend with alpaca definitely blocks better than wool blend with nylon/acrylic.  It takes a long time to dry though; I had to lock the projects in my room while they dried to prevent one of my cats from playing with them and ruining all my hard work.

While I love wearing cardigans, I am slowly not liking knitting them. Except for Andi’s cardigans (which are cropped and quick knits), they take forever.  I thought I would never get done with Ginny’s cardigan.  The back and forth knit and purl rows were starting to drive me crazy. I have one more cardigan on my 2014 plans but the rest are pullovers.